 |
|||||||||||||||||||||||||||||||||||||||||||||||||||||||||||||||||||||||||||||||||||||||||||||||||||||||||||||||||||||||||||||||||||
|
If you have trouble viewing this newsletter, click here. Welcome again to our monthly educational newsletter with features on exciting celestial events, product reviews, tips & tricks, and a monthly sky calendar. We hope you enjoy it!
Announcing the launch Starry Night Education's NEW Educator's Forum, the place to share ideas and resources, ask questions and discuss astronomy education. To celebrate the launch, we're running two exciting contests!
You can enter as many times as you like, prior to contest close on September 24th. We'll pick the top ten entries in each category, and then YOU get to vote for your favorite! Winners will each receive 3 of our Award-Winning Classroom DVDs. Good Luck and Clear Skies! Claire Rothfels
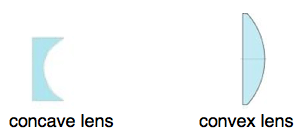
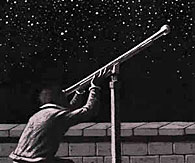
During the past several months, we have discussed Galileo’s most important discoveries made with telescopes of his own manufacture. Although lenses had been known in the western world about 300 years before, their main use was for the making of spectacles. The earliest telescope patent was filed in 1608 by, among others, Hans Lippershey of the Netherlands. Galileo made his own version of this device in the summer of 1609. It consisted of a convex lens at the front of the telescope and a concave lens where the eye was placed. It magnified objects about 3 times.
Not much could be seen with these instruments so Galileo produced better versions in the next few months.
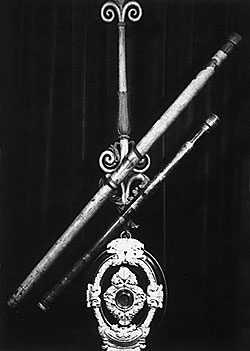
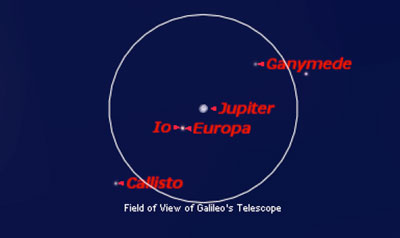
Two of Galileo's telescopes When Galileo turned his telescope to the skies in the fall of 1609, he used a telescope which magnified objects about 20 times. This much more powerful instrument helped him be the first to see Jupiter’s moons and other astronomical wonders.
The telescope was about 1 meter long and only the central part of the convex lens was used so images were not very sharp and bright. A small field of view of about one quarter of a degree made it difficult to find objects and keep them in the field of view. It is therefore not surprising that Galileo did not see all of Jupiter’s large moons on January 8, 1610. Check out the February 2009 Starry Night Times to learn more. One of the original telescopes made by Galileo is on exhibit at the Franklin Institute in Philadelphia until September 7, 2009. Herb Koller
Well September is finally here and you’re looking forward to resuming your teaching career with new students, new subjects and a summer’s worth of new ideas. But then realization dawns on you — you have to teach astronomy for the first time! No need to worry. You and your students will have a great learning experience in astronomy class. To help you get started here’s my four step plan: Step 1 Use your state/county or district’s curriculum requirements to extract the topics you have to cover. You can find your state requirements at starrynighteducation.com/resources_free.html Make sure you can fit all requirements into the allotted time. Step 2 Gather resources that will help you understand and present the topics in a fashion that will engage and excite your students. This most often means visual and interactive materials. Starry Night Education has done all of this work for you. Whether you teach elementary, middle, high school or college, there are ready-to-use lessons and sufficient support materials to cover all your needs. For more information and sample lessons check out starrynighteducation.com Step 3 Organize your materials in a logical sequence and provide plenty of hands-on opportunities for your students. Your plans should be flexible enough to allow for forays into topics beyond the curriculum guidelines. You may note that Starry Night curriculum materials give you lots of ideas and support for student exploration. Step 4 Collaborate and share your ideas and activities with your colleagues. Not only will this enrich your adventures in astronomy but it is an excellent method for sharing tips and solutions to common or specific problems. Starry Night Education has established a community group to help facilitate such sharing of ideas. Check us out at starrynighteducation.com/community.html Step 5 Yes, I know there are only four steps in my plan, but this is too important to ignore: Have fun and enjoy! Your enthusiasm will surely infect your students and this in turn will make you want to teach astronomy again and again. Herb Koller
An essential for a successful astronomy club is an enthusiastic and knowledgeable adult to serve as mentor. This need not be a teacher; there are active astronomy clubs in most major centers which often have school outreach programs. It also helps to have a core of enthusiastic kids as members. When I was a teenager, I was asked by a young member of my club to give a talk to the club he was starting at his high school. He did not have the benefit of a teacher sponsoring his club, so, when the time came for me to give my talk, the audience consisted of David, his brother, and their beagle. Needless to say, poor David was excruciatingly embarrassed, but I delivered my talk as promised, and the experience did him no permanent damage. He is now one of the world’s best known astronomers, David Levy, discoverer of Comet Shoemaker-Levy 9 which collided with Jupiter in 1994. Perhaps the biggest problem is often expressed as “When the stars come out, the kids go in.” Especially in spring and fall, when temperatures are moderate, it doesn’t get dark until quite late, often past the bedtimes of younger students. When it does get dark earlier, parents are still often nervous about night-time activities. So the problem is often finding daytime activities which relate to a nighttime occupation. One interesting daytime activity is to study the movement of the Sun. An easy way to do this is to glue a small mirror on a west-facing window ledge, so that the Sun’s light is reflected to a spot on a wall. The position of the reflection can be marked every five minutes for an hour or two, and then repeated the following day or week. This shows kids how individual “data points” gradually accumulate to display patterns in nature. Nowadays, the internet provides an enormously valuable resource for astronomy and space. The main problem is the highly variable quality of the information online. You can start by downloading our Welcome Guide to Astronomy. You can print and distribute this handy guide to club members or anyone in your school. Here are some of the most reliable and valuable resources on the internet:
Finally, there is that number one resource for learning about astronomy: Starry Night® software! I really urge you to allow your kids to play with Starry Night®. I guarantee they will discover things in the program you never even dreamed were there. For starters, there are huge areas to explore under the SkyGuide tab and under the Favorites menu. Encourage students to share their discoveries with the other members of the club—you and they will both learn more astronomy than you ever dreamed possible! Geoff Gaherty
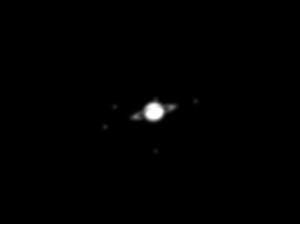
When Galileo first looked through his telescope at Saturn, he thought it had two large companion planets on either side of it. He probably saw something like this:
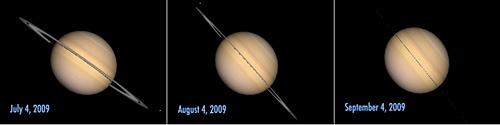
Once he saw them seem to shrink and disappear, and then return. We know now that Saturn has rings, which looked like large companions in Galileo's small and primitive telescope – and when they seemed to disappear, he was actually seeing the rings edge-on. This happens every fifteen years, when the Earth crosses Saturn's ring plane. The last such crossing, in February 1996, was relatively easy to observe, as Saturn was setting a few hours behind the Sun at the time. This year we aren't so lucky; on September 4, when we cross the ring plane, Saturn will be a mere 10° away from the Sun in our sky. It won't be safe to observe with an Earth-bound telescope. Fortunately, Starry Night is here to simulate the view:
Brenda Shaw
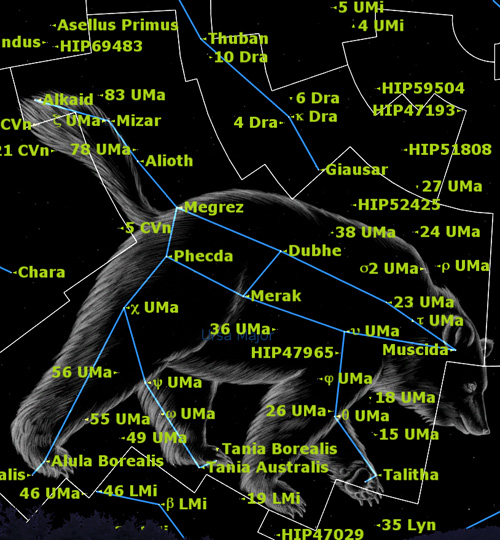
There are commercial operations which will, for a substantial fee, claim to let you “purchase” a star and name it after yourself or a loved one. Truth is that naming stars in this way has no official standing and will never be used by professional astronomers. In fact, anyone can setup a company that “sells” star names and a few people have. People have good intentions when naming a star for someone, and it’s always bothered me that they are led to believe that a star will be officially designated with the name they selected. But if you understand that naming a star is for fun and it’s the intention that matters, then you have the right attitude. Why not play up on this idea and offer donors to your school the chance to adopt a star. Starry Night® will help you select stars and let you print attractive star maps so that the donor can easily locate the star in the evening sky. As long as everyone understands that this is being done for fun and charity, it’s a great way to get people interested in astronomy, provide a useful service, and raise a few bucks. Rather than picking stars from all over the sky, I’d recommend focusing on a particular constellation. Circumpolar constellations like Ursa Major and Cassiopeia are good because they’re always in the sky. Or you can choose a constellation which relates to whatever the funds are being raised for: Lyra for the music department, Hercules for the weightlifting team, or Sagittarius for the archery club. To get some idea of the stars available in a particular constellation, use Starry Night®’s Find feature. Click on the Find tab, then click on the little magnifying glass and choose “Constellation.” Enter your constellation and check the box, Then click on the menu button and choose “Centre.” Under the “Labels” menu, choose “Stars.” Starry Night®’s default is to show only the brightest stars, so go to “Stars” under the “Options” menu. Slide the slider at the bottom to “More Stars.” Starry Night displays star names depending on their brightness. To make them all display clearly, go to “Preferences” in the Starry Night menu (“Help” menu in Windows) and choose “Brightness/Contrast.” Remove the check mark from the box labeled “Fade object labels…” Turn on a few more options and you should have a map that looks like this:
This gives you a map from which donors can select the star they wish to adopt. Large donations receive one of the bright named stars, medium donations the stars with Greek letters, and small donations the numbered stars. Since we want to emphasize that these stars are being adopted, not purchased, they should keep their real names. To produce a certificate for each donor, turn off the star labels in Starry Night® by clicking Stars under the Labels menu. You can now highlight individual stars by double clicking on them, so that just that star is labeled. Export this image using the “Export As Image…” under the File menu, and then import it into a certificate in your word processor. Print that out, and your donor has an excellent memento of his adopted star, and can easily find it in the night sky. Geoff Gaherty
Asterisms The Teapot, The Big Dipper, The W and The Square of Pegasus are but a few of the many popular asterisms visible in the night sky. Challenge yourself or your students this school year to “bag” as many as they can find. Better yet, ask them to come up with your own asterisms. Pedro Braganca
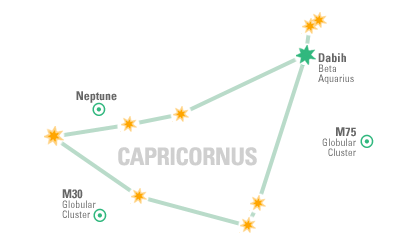
From mid-northern latitudes Capricornus sails low over the southern horizon, between Sagittarius to its West and Aquarius to its East. Right off the bat, Neptune makes for an easy binocular target. Using a telescope, you can compare its subtle hue against Uranus' over in Aquarius. Dabih is an easy binocular double, hanging below Alpha Capricornus, an easy naked-eye double. The lower pair are separated by 20,000 lightyears but are actually part of the same gravitational system; a physical double. The alpha pair are an optical double, the brighter lying 109 lightyears from Earth and the dimmer lying a further 578 lightyears along the same line of sight. M75, while technically in Sagittarius, is a nice Mag 8 globular cluster. The horizontal bar of a cross asterism at 62 Sagittarii points the way. M30 (NGC 7099) is a large, dense globular cluster, roughly 26,000 light years distant. Sean O'Dwyer
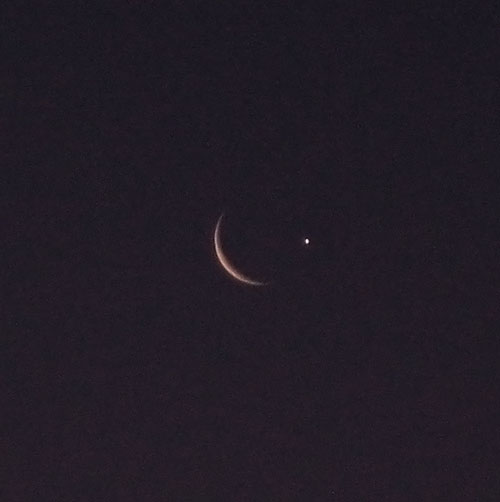
Moon/Venus occultation on April 22, 2009. Taken by David Likuski from Oakland, Ca.
RULES: We would like to invite all Starry Night® Education users to send their quality astronomy photographs to be considered for use in our monthly newsletter. Please read the following guidelines and see the submission e-mail address below.
|
SEP. 2009
|
||||||||||||||||||||||||||||||||||||||||||||||||||||||||||||||||||||||||||||||||||||||||||||||||||||||||||||||||||||||||||||||||||
 |
|||||||||||||||||||||||||||||||||||||||||||||||||||||||||||||||||||||||||||||||||||||||||||||||||||||||||||||||||||||||||||||||||||
|
|
|||||||||||||||||||||||||||||||||||||||||||||||||||||||||||||||||||||||||||||||||||||||||||||||||||||||||||||||||||||||||||||||||||


You have received this e-mail as a user of Starry Night® or as a registrant at starrynighteducation.com
To unsubscribe, click here.