|
If you have trouble viewing this newsletter, click here.
Welcome again to our monthly newsletter with features on exciting celestial events, product reviews, tips & tricks, and a monthly sky calendar. We hope you enjoy it!
- The Cosmic Lesson Competition
High School and Middle School teachers and their students are invited to participate in a unique, year-long learning adventure and the opportunity to win a Digital STARLAB Planetarium system valued at $58,000.
- Astronomy's Dirty Little Secret
Brenda Shaw discusses 'astroporn'—the beautiful images featured in magazines that give beginners the impression that their telescope will take them on a colorful voyage through the Universe.
- Staging a Solar System Play
Geoff Gaherty uses classroom kids to represent the objects in the solar system and the universe around it!
- Constellation in Focus: Auriga
This faint winter constellation holds three Messier jewels.
- Astrophoto of the Month
Garret Grainger's beautiful capture of the Rosette Nebula.

Learning Technologies, Inc. and Starry Night® Education are pleased to announce The Cosmic Lesson Competition.
High School and Middle school teachers and their students are invited to participate in a unique, year-long learning adventure and the opportunity to win a Digital STARLAB Planetarium system valued at $58,000.
Using a team approach, participants will be challenged to create a dynamic lesson using Starry Night® software for ultimate presentation in the Digital STARLAB Planetarium. Incorporating outside images, video and data, teams will attempt to create the most effective and impressive lesson possible.
Competition Timeline
- The competition teams will gain proficiency with the software during the spring and summer months of 2008. They will learn and practice Starry Night® software discovering all of its depth and breadth of data and presentation functionality.
- On September 1, 2008, the specific subject, which the lesson must address, will be announced to all participating teams. The subject will have an earth and space science focus. Teams will then have the period of September 1 through December 31, 2008 to create their actual Cosmic Lesson.
- The completed Cosmic Lesson entries must be submitted by December 31, 2008.
In additional to a fabulous learning experience for teachers and students, the first place team will receive for their school a complete Digital STARLAB Projection system with 5-meter portable dome powered by Starry Night® software valued at $58,000. Additional prizes include two telescope packages.
To learn more or to register, go to cosmiclesson.com
This competition is a joint project of Learning Technologies, Inc. (visit: starlab.com) and Starry Night® Education (visit: starrynighteducation.com).
Pedro Braganca
Content Director, Starry Night®
[Top of Page]

Astronomy's dirty little secret has been what I like to call ''astroporn''—beautiful images featured on telescope boxes and in magazines that give beginners the impression their telescope will take them on a colorful voyage through the universe.
Of course, the dirty secret is that you have to attach a camera to the telescope and take lengthy time exposures to build the image, which might still not look as good as the ones in the box. For some people, it can be disappointing enough to make them put away their telescope for good. The truth is that most objects seen through an optical telescope will reveal little to no color—our eyes are simply not sensitive enough.
The work-around is to know what objects will look good through your telescope to avoid early disappointment. But perhaps the best advice is that one should read up on an object before observing it. If you know something about the object, you'll have a better appreciation of what you are observing—be it a stellar nursery or a galaxy millions of light years-away. Even if the view through the telescope doesn't show a lot of detail, you'll be delighted to know that you are seeing it with your own eyes.
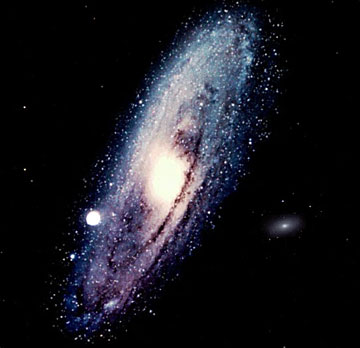
Figure 1. A long exposure photograph of the Andromeda Galaxy (M31).
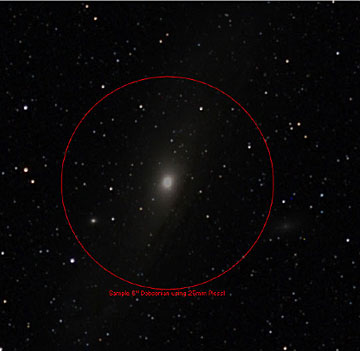
Figure 2. A realistic view of the Andromeda Galaxy (M31)
as seen through a 6” telescope under dark skies.
There are two big reasons why the view through a telescope doesn't look like all those pictures.
Time exposures
When you look at an object, your eyes and brain are effectively creating a series of thirty 'pictures' every second. This allows you to detect motion (compare it to the way a cartoon simulates motion through a series of still pictures shown in rapid succession). In other words, if an object doesn't give off enough photons in one thirtieth of a second, you can't see it. If your eyes and brain took fewer pictures per second, each one would contain more photons and you'd be able to detect fainter light sources – but then, you wouldn't be able to see movement as efficiently.
Astrophotography is done by leaving the camera shutter open and pointing at its target for a very long time. The camera records incoming photons from the target for as long as the shutter is left open. If it's left open long enough, the sensor (the film or the light-sensitive chip) will eventually accumulate enough signal to bring out even the faintest details of the object. Areas of the image corresponding to brighter parts of the object will appear brighter because more photons fell there.
The way to get more photons to your eye in a thirtieth of a second is to use a larger telescope.
A telescope is like a light funnel. Its wide barrel intercepts more photons from the sky than your tiny eye can, its mirrors or lenses focus that light into a narrow beam, and when you look through the eyepiece all of that light goes into your eye. The wider the telescope, the more photons you get, and the brighter and more detailed the image appears. (Take a look at a nocturnal animal like an owl, a cat, or a bushbaby—they have huge eyes to help them gather more photons in a low-light environment.) But no matter how big a telescope you're looking through, putting a camera on that same telescope and taking time exposures will result in a brighter and far more detailed image.
Color sensitivity
Every photon that comes at you has its own wavelength. The human eye interprets different wavelengths as colors, and can only detect a narrow range of possible wavelengths. The longest wavelengths we can detect make us see what we call 'red', and the shortest produce 'violet'. If you don't get enough photons, you might be able to see the shape of a light-emitting object without being able to tell what color it is. A similar phenomenon is reported by some people who are legally blind, and who can see vague light and dark shapes around them but do not see color.
The most surprising thing about modern astronomical cameras is that they don't see color at all! They are digital cameras, and they are sensitive to a wider range of wavelengths than the human eye is, but when they send their data to a computer, there's no way to tell what color each photon was when it came in. The output is a grayscale picture.
Astronomers who want to take detailed color pictures do this by using filters. A standard 'RGB' set of filters has glass plates of red, green and blue. When you put the red filter in front of the camera, only red photons get to the sensor. The output on the computer still doesn't look red until you use image manipulation software to make it red. If you then take pictures of the same target with the green and blue filters, you can color the images green and blue respectively, and then combine all three to create a full-color image (similar to the way color books are printed by overlapping yellow, magenta, cyan, and black images).
In other words, the colors in an astronomical image are false colors. If you looked at the object you wouldn't be able to see the colors, so the image is colored to show you what it would look like if you could. Of course, this is a subjective process, and an astronomer trying to make a pretty image will experiment with various shades of red to use on the red-filtered image. To make matters even more confusing, an astronomer trying to make a scientific image and bring out as much detail as possible might even use colors that don't correspond with the filters, in order to increase contrast and see details that might have been missed otherwise.
On top of that, an astronomical camera can detect photons in a slightly wider range than our eyes can. Another type of standard astronomical filter set comes with an infrared filter, which lets through photons that have a slightly longer wavelength than red photons. The output is still a grayscale image that is displayed as a visible pattern of light and dark on the computer screen. No matter what color is assigned to it in the finished color image, it won't be 'accurate', because the true color is one that we can't even see.
And now for the good news...
When you look through a telescope for the first time one thing that's important to realize is that your eyes are not trained to see such faint things with such subtle levels of detail. The more you use your telescope, the better you'll get at seeing through it. Mars might look like a yellow ball at first glance, but with practice you'll be able to see differences in color across its surface, and white frost caps when one of them is tilted towards the Earth.
 If you're ambitious, you might even want to get into photography yourself, and learn how to coax beautiful pictures from your equipment. If your telescope has a motorized mount so that it can track the sky as the Earth rotates, it can stay pointed at any object for at least a little while. (More expensive mounts are better at this, of course, and don't vibrate or drift as much as cheaper ones.) Recently, some astronomical cameras for beginners have come on the market with much friendlier price tags that won't scare anyone who has ever bought even a cheap telescope. Even a video camera or Web cam can be used for astrophotography. One popular technique is to take video through the telescope, choose only the clearest and steadiest frames, and then stack and line them up on your computer and combine them to bring out more detail than any single frame has by itself. If you're ambitious, you might even want to get into photography yourself, and learn how to coax beautiful pictures from your equipment. If your telescope has a motorized mount so that it can track the sky as the Earth rotates, it can stay pointed at any object for at least a little while. (More expensive mounts are better at this, of course, and don't vibrate or drift as much as cheaper ones.) Recently, some astronomical cameras for beginners have come on the market with much friendlier price tags that won't scare anyone who has ever bought even a cheap telescope. Even a video camera or Web cam can be used for astrophotography. One popular technique is to take video through the telescope, choose only the clearest and steadiest frames, and then stack and line them up on your computer and combine them to bring out more detail than any single frame has by itself.
Of course, sometimes it just doesn't matter that the actual view doesn't look like the picture. Looking right at a planet or a galaxy and catching its photons with your own eyes is something special, even if the target is faint and fuzzy. It's the difference between looking at telephoto pictures in National Geographic, and actually going to Africa to catch a distant, brief glimpse of a live wild elephant. Pictures can show you a lot that you may never see with your eye, but sometimes the knowledge that you're right there living the experience can be worth much more.
Some of our favorite objects for telescopes
These are sure to delight even in small telescopes. Here are some of our favorite objects for viewing even with modest optical equipment such as large binoculars or a small telescope.
- The Moon
Bright enough that there's no reason to worry about lack of photons, the Moon is an impressive target through any optical instrument. Start with your eyes and binoculars, and work your way up to higher magnifications in telescopes, and you will never get bored with the increasing levels of detail. Best time to observe? During any phase of the Moon other than new or full, scan along the terminator (the border between the dark and light sides of the Moon) for some sharp-shadowed views of craters and mountains.
- Jupiter
The biggest planet in our solar system may look like a snowball the first time you see it through a telescope, but even a small instrument can show you the familiar butterscotch-ripple details once your eye is acclimated. Try looking at Jupiter in a twilight sky just after sunset or before sunrise; you might find it easier to see the color bands when your eye is not dealing with the intense contrast of a pale planet on a black sky. For an additional treat, try making observations a few hours apart, and see if you can spot the motion of the four inner moons.
- Saturn
Even a very modest telescope can reveal Saturn's rings. Bigger telescopes can resolve finer details to the point where you can see space between the rings and the planet, or even see the famous Cassini division, the empty gap between the A and B segments of the planet's ring structure.
- The Pleiades (M45)
This cluster of young stars is in fact better seen through a smaller instrument with a wider field of view. It's a classic binocular object, easy to spot naked-eye even from a light-polluted location. Too much magnification and you'll find yourself looking right through it and not seeing the stars at all!
- Andromeda Galaxy (M31)
Our nearest galactic neighbor is two and a half million light years away, and is estimated to be twice the size of our own Milky Way. All but the biggest backyard telescopes will reveal only the bright central bulge; a big scope and a trained eye under a dark sky will be able to coax out some of the spiral structure of the outer arms.
- Orion Nebula (M42)
This is one deep-sky target that looks good through any optical instrument, no matter how modest or how powerful. Also known as the Sword of Orion, this giant star-forming region has an appropriately nest-like structure that can be seen even in binoculars. Mid-sized telescopes can reveal more detail, including wispy gas tendrils and newly-formed stars.
- Albireo
Marking the head of Cygnus the swan, Albireo is an easily-resolved binary system famous for the brilliantly contrasting blue and yellow colors of its stars.
- The Ring Nebula (M57)
This planetary nebula, a gas bubble that was blown off the surface of a dying star, looks like a small round smudge in binoculars and small scopes. A mid-sized telescope will reveal a well-defined circular 'smoke ring' shape.
Brenda Shaw
Brenda is an avid stargazer who enjoys guiding everyone to the stars, sharing her passion and knowledge with others.
[Top of Page]

I do a lot of classroom presentations on basic astronomy. My favorite exercise is to build a working model of the solar system using the children in the classroom—that is, using the actual kids to represent the objects in the solar system along with the starry universe around it, with the help of Starry Night®!
I assemble the kids in the school gym and explain that we're going to put on a play about the solar system, together, with each of them playing a part. I first choose twelve kids to be the background for the drama: to portray the twelve constellations of the zodiac.
I prepare in advance twelve large constellation charts, printing them on the largest paper that my printer can handle. I'm thinking of adding the thirteenth zodiac constellation, Ophiuchus, because of the interesting points I can make here about the difference between astrology's fictional twelve zodiac signs and the thirteen constellations which actually lie along the real ecliptic.
To print these charts in Starry Night® I enlarge the printed star sizes (under Preferences:Brightness/Contrast). I change the star type to “Kids”, set the maximum star size quite high and the minimum star size a bit higher than normal, and star color to maximum. Under “View” I turn on the constellation lines and labels:
I have these twelve (or thirteen) kids stand against the gym wall 30 degrees apart from each other, holding up their star charts, to form the zodiac band around the outside of the solar system, the backdrop to our drama.
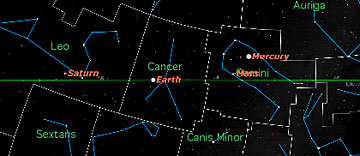
The other preparation I do ahead of time is to use Starry Night® to travel to the Sun, set the date and time for approximately when I'm doing my presentation, and then determine the positions of the planets relative to the constellation background.
For example, if I was doing a presentation at 9 AM on February 1, the view from the Sun towards Cancer would show four planets: Mercury and Mars in Gemini, Earth in Cancer, and Saturn in Leo:
Similar charts show Venus in Libra, Jupiter in Sagittarius, Neptune in Capricornus and Uranus in Aquarius.
I choose one kid to be the Sun, usually someone wearing a bright yellow sweater, place them in the center of the gym, and explain to them how they are the biggest and most important object in the solar system, and how everything revolves around them, except the stars. Then I work my way outward, placing the kid representing each planet between the Sun and the constellation where they're currently located. So I put Mercury close to the Sun in the direction of Gemini, and Venus a little further away in the direction of Libra. I place Earth further out still, in the direction of Cancer.
This is a good time to point out how the inner planets, Mercury and Venus, never stray far from the Sun in from Earth's point of view, and where they are currently in the sky relative to the Sun. I usually assign another kid to play the Moon, with instructions to revolve around the Earth once we set the model in motion.
Next I place Mars in front of Gemini, which would be a good place to talk about how the inner planets sometimes transit the Sun. Now I leave a bigger gap, for the asteroids, and place Jupiter in front of Sagittarius. This gives me a chance to explain why we can't see Jupiter well at present, because the Sun is in the way. Finally I place Saturn in front of Leo, Uranus in front of Aquarius, and Neptune in front of Capricornus.
If I think that there may be more kids than constellations and planets, I make sure I have the positions of Pluto, Eris, and Ceres just in case. If I have a Pluto, I explain how they really should be up on a ladder, since they're above the plane of the solar system right now (in Sagittarius); Eris currently is in Cetus, and so should be lying on the floor near Pisces.
It's amazing how much clearer the relationship between the planets in space and the planets in the sky becomes clear through this exercise. Learning theorists have shown that children have great difficulty is stepping outside the system to see internal relationships, a difficulty greatly reduced in this living model. With all the kids arrayed around the gym, it becomes easy to explain how we see some constellations at one time of the year, and a completely different set six months later.
Finally when all the “actors” are in their “places,” I explain how the planets all move in the same direction but with different speeds, and then set the whole model into motion. The ensuing chaos is fun for everyone, but the feedback I've received from both kids and teachers after going through this exercise is that it really locks in a number of important concepts in a permanent “whole body” way.
Geoff Gaherty
Geoff has been a life-long telescope addict, and is active in many areas of visual observation; he is a moderator of the Yahoo "Talking Telescopes" group.
[Top of Page]

Auriga is most notable for its three bright open clusters and for sporting one of the ten brightest stars in the night sky, Capella.
In ascending order of interest are Auriga's three Messier-designated open clusters: M36, M38 and M37. All are clearly visible to the naked eye from a dark site and, in binoculars, appear as bright fuzzy patches; naturally, a telescope brings out the most detail. M36 will show around 50 stars in an 8" scope while M38 shows twice as many stars, some in apparent chain-like arrangements. But the most notable of the trio is M37. In a 12" scope, roughly 150 starts are visible in this neatly arranged cluster, some tinged red.
NGC 1931 is a bright emission nebula surrounding a very small open cluster. With high magnification in an 8" telescope, the nebula is quite apparent.
Sean O'Dwyer
Starry Night® Times Editor
[Top of Page]

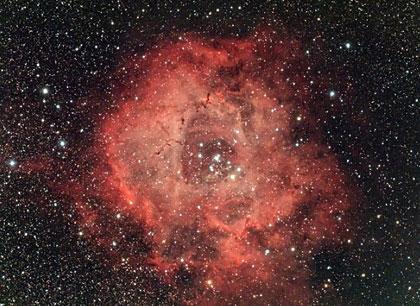
Rosette Nebula - NGC2244
Taken by Garret Grainger on January 1, 2008. Imaging scope was Orion ED80. Camera was Canon Rebel XT - Hap Griffin Modified. Acquired and processed in DSLR Focus V3, IRIS, PS CS2. Filters were WO 0.80 Reducer / Flattener & IDAS LPS.
The Rosette Nebula is a large, circular H II region located near one end of a giant molecular cloud in the constellation Monoceros. The open cluster NGC 2244 is closely associated with the nebulosity, the stars of the cluster having been formed from the nebula's matter.
PRIZES AND RULES:
We would like to invite all Starry Night® users to send their quality astronomy photographs to be considered for use in our monthly newsletter.
- Featured submissions (best of month) will receive a prize of $75 USD.
Please read the following guidelines and see the submission e-mail address below.
- Format: Digital images in either JPG, GIF or TIFF format.
- Size: 700 pixels wide maximum.
- File size should be less than 2 MB.
- Include a caption: Your full name, location where photo was taken and any interesting details regarding your photo or how you took it. Please be brief.
- Important notes: We may edit captions for clarity and brevity. We reserve the right to not use submissions. In submitting your image or images to Imaginova®, you agree to allow us to publish them in all media—on the Web or otherwise—now and in the future. We'll credit you, of course. Most important, you'll have the satisfaction of sharing your experience with the world!
- Send images, following the above guidelines, to photo@starrynight.com (by sending an image you agree to the above terms, including Imaginova®'s right to publish your photos). Please do not send .ZIP files as they will not reach us.
[Top of Page]
|
 |
 |
|
|
|
 |
|
SLOOH Chile Panorama
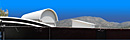
Paul Cox of SLOOH.com supplied this beautiful horizon panorama that makes you feel like you are inside one of the SLOOH domes high above the mountain tops.
SLOOH.com offers the opportunity to control a robotic telescope and take breathtaking images of celestial objects from your home computer.
|
|
|
SN Pro 4.x and higher users: simply download these two files and place them in your Sky Data/Horizon Panoramas Folder.
Pedro Braganca
Content Director,
Starry Night®
|
|
 |
|
|
|
 |
|

A guided video tour of celestial events visible this month.
• Click Here to Download
|
|
 |
|
|
|
 |
|
Getting Help
Starry Night® is easy to use but there are places to turn if you run into trouble. We first suggest the Starry Night® User's Guide which can be found by selecting User's Guide from the Help menu.
Check out the Appendix for a list of Frequently Asked Questions.
For the latest information on Starry Night® updates and troubleshooting tips, please visit our Knowledge Base.
Pedro Braganca
Content Director,
Starry Night®
|
|
 |
|
|
|
 |
|
Moon Phases
 New Moon: New Moon:
Feb. 6
10:44 PM
 First Quarter: First Quarter:
Feb. 13
10:34 PM
 Full Moon: Full Moon:
Feb. 20
10:31 PM
 Last Quarter: Last Quarter:
Feb. 28
9:18 PM
Observing Highlights
Fri., Feb. 1
Venus-Jupiter, 7:35 AM
Venus and Jupiter pass by less than a degree from each other, very low in the southeastern sky before dawn. The crescent moon is a bit farther to the south. This appears quite low to the horizon in the constellations of Sagittarius. The best time to observe is 45 minutes to a half hour before local sunrise.
Wed., Feb. 20
Full Moon, Total Lunar Eclipse, 10:31 PM
Lunar eclipses can occur only at Full Moon. And eclipses tend to come in pairs, with a solar eclipse paired with a lunar eclipse. This one follows two weeks after the annular solar eclipse from early in the month. Unlike that earlier eclipse, this eclipse is widely visible across North America -- the last until Dec. 20, 2010. Since a Full Moon is opposite the Sun, it rises at about sunset. In this case, the Moon is well above the horizon for the eastern two-thirds of the continent, with the early phases of the eclipse seen in progress at moonrise from the Rockies to the Pacific. The main (umbral) part of the eclipse begins at 8:43 PM Eastern time; maximum eclipse is at 10:27 PM; and the umbral phase is over at 12:09 AM (on the 21st). Lighter, penumbral phases precede and follow the umbral phase, but they are not always obvious to the average observer. (Subtract one hour from these times for Central Time, two hours for Mountain, and three hours for Pacific.)
By the way, there are two "eclipses" tonight. Several hours the Moon is eclipsed, it passes in front of the bright star Regulus in Leo (about 10:30 PM Eastern on Wed.). From most of South America, this can be seen as an "occultation," which is the same as an eclipse of the star by the Moon.
Sat., Feb. 23
Zodiacal Light, evening dusk
Due to the geometry of the Earth's orbit and the fact that there is no Moon to see in the western twilight for the next two weeks, this could be a good time to look for the elusive "Zodiacal Light." This is a large, faint, cone shaped glow rising from the place on the horizon where the Sun goes down. Apparently centered on the Sun and typically rising at an angle to the South, this diffuse glow is likely caused by sunlight reflecting off tiny particles along the orbital path of the planets (the Ecliptic).
Planets
Mercury passes between Earth and Sun on the 6th (inferior conjunction) and cannot be seen at all until about mid-month, when it emerges into the southeastern morning sky not far from Venus. In fact it passes by Venus on the 25th. However, current orbital geometry causes this to occur low in the sky, so neither planet is visible until about an hour before sunrise, and are quite low as the sky brightens.
Venus is always bright, but as mentioned with Mercury above, the current orbital geometry dictates that it appear quite low in the southeastern sky, and only for a short while before sunrise.
Mars still dominates the evening sky in Taurus, but it is receding from the Earth and getting smaller and dimmer. In February it is roughly halfway between Aldebaran in Taurus and Pollux in Gemini, near the star cluster M35, high overhead at mid-evening. The Moon passes nearby on the evening of the 15th.
Jupiter is in the morning southeast sky, but as with the other two morning planets, Mercury and Venus, the inclination of the Ecliptic to the horizon means that this planet appears only low in the sky. However, it appears a bit farther from the Sun than Venus or Mercury, so it is a bit better placed. Look for it in Sagittarius, low in the southeast a hour before sunrise. Venus is brighter but lower and to the left.
Saturn is in Leo, and opposite the Sun on the 24th. It is well placed for viewing all night. It is quite easily seen during the lunar eclipse on the 20th, when it will be just to the left of the eclipsed Moon.
Dates
Fri., Feb. 1
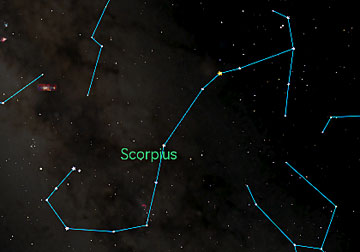
Moon-Antares, predawn
The Moon passes near Antares in Scorpius before dawn this morning. The closest approach (about the width of the Moon) unfortunately comes well after daylight, but the two are pleasingly close in the south-southeastern sky at dawn.
Wed., Feb. 6
New Moon, 10:44 PM
Don't bother looking for this on the 6th, but very sharp-eyed observers may possibly catch a razor-thin crescent low in the southwest on Thur., just as it begins to get dark. (Actually, seeing it on Thur. is unlikely, but worth a shot.) It is easier to see on Fri. and subsequent evenings.
Fri., Feb. 15
Moon-Mars, evening
The Moon is near bright Mars tonight, in Taurus. Closest passage is about 6 moon-diameters, but this is several hours after midnight, and unfortunately after moonset in most locations. Earlier in the evening you can see the Moon just to the East of Mars. On Sat. night it appears a bit farther away, but this time to the East.
Tue., Feb. 19
Moon-Beehive Cluster, 3 AM
The nearly Full Moon passes to the North side of M44, the Beehive cluster in Cancer, the Crab. The bright Moon drowns out the faint stars of the cluster, unfortunately.
Thur., Feb. 21
Moon-Saturn, 6:50 AM
After the total lunar eclipse, the Moon passes near Saturn in the sky, about 3 degrees south of the planet.
Sun., Feb. 24
Saturn at opposition, 4:46 AM
Saturn is opposite the Sun, meaning that it rises at about sunset and sets at about sunrise (in Leo). At this time it also is at its closest point to Earth, but still at a whopping 8.29 Astronomical Units, or about 771,000,000 miles! And at +0.2 magnitude, it is about as bright as it ever gets. Try your Christmas telescope on it to see the rings!
Mon., Feb. 25
Mercury-Venus, 9:34 PM
Venus passes Mercury by less than a degree and a half, but the actual moment of closest approach comes when they are not visible from North America. However, sharp-eyed observers can catch them in very low to the southeast about a half hour before sunrise on Mon. and Tue.
Fri., Feb. 29
Moon-Antares, predawn
The Last Quarter Moon passes near Antares in the southeastern sky before dawn. Closest approach occurs before moonrise on Thur. evening, but the two make a nice sight when they come up several hours after midnight on Fri. morning.
Sun., Mar. 2
Moon-Jupiter, predawn
A thin Waning Crescent Moon passes a few degrees from Jupiter, low in the southeastern sky just before morning twilight. The actual closest approach is 7:53 PM on Sun., but neither are visible at that time. You can catch a similar sight on Mon. morning, when you can notice that the Moon appears to the other side (left or eastern) of Jupiter.
Mon., Mar. 3
Mercury greatest elongation west, 6:13 AM
Both Mercury and Venus oscillate from east to west around the sun, alternatively appearing as evening or morning stars. Right now they are both to the west of the Sun, rising before dawn. Today Mercury is as far to the west as it goes in this orbit, a phenomenon called an "elongation." Both planets are low and not real easy to spot, because of the current geometry of Earth's orbit. But you can try looking about a half-hour before dawn, if you have an unobstructed horizon to the southeast.
Wed., Mar. 5
Moon-Mercury-Venus-Neptune, predawn
On this day the razor thin Waning Crescent Moon passes not far from three planets, and actually occults (eclipses) all three as seen from various locations. Unfortunately, however, these events occur after sunrise from most North American locations. Telescopic observers in North American may observe the occultation of Mercury (about 9 AM eastern), but the others are only close approaches. You can look before dawn, however, to see the Moon near Venus and Mercury. Neptune is too faint to be seen without a telescope and a finder chart.
As always, there's more to explore on NightSky.
All times shown are U.S. Eastern Time.
|
|
 |
|
|
|
 |
|
Join the Starry Night® Affiliate Program
If you publish a space or astronomy Web site or blog, earn extra cash by promoting Starry Night® on your Web site.
Click here to learn more!
It's easy to join and it's free!
|
|
 |
|
|
|
 |
|
Send us your feedback
Do you have a question, comment, suggestion or article idea to pass along to Starry Night® Times?
Click here to get in touch with us.
|
|
|
|
|
|
 |
|
Starry Night® is the world's leading line of astronomy software and DVDs. Visit starrynight.com to see all the great products we offer for everyone from novice to experienced astronomers.
You have received this e-mail as a trial user of Starry Night® Digital Download or as a registrant at starrynight.com.
Starry Night® is a division of Imaginova® Corp.
To unsubscribe, click here.
To subscribe, sign up here.
Imaginova® Corp.
470 Park Ave South
9th Floor
New York, NY 10016
|
|
 |
|