 |
||||||||||||||||||||||||||||||||||||||||||||||||||||||||||||||||||||
|
If you have trouble viewing this newsletter, click here. Welcome again to our monthly newsletter with features on exciting celestial events, product reviews, tips & tricks, and a monthly sky calendar. We hope you enjoy it!
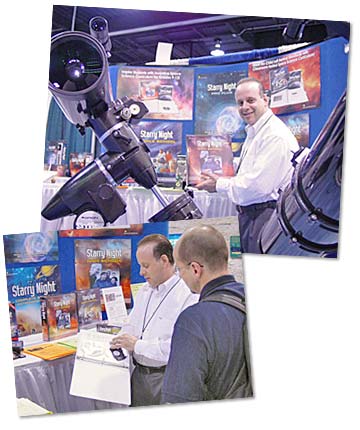
NSTA 2006 – Anaheim, CA, April 6-8 Starry Night® conquers Disneyland. The cloudy April skies could not dampen the excitement in the Anaheim Convention Center as Starry Night® team pulled out all stops to showcase Starry Night® Middle School and High School and Orion Telescopes. Thanks to all those who stopped by our booth and attended our workshops, and a special thanks goes to the teacher who attended 3 different Starry Night® workshops in one day.
If you are interested in Starry Night® for your school, please contact Mike Goodman (pictured above) at (952) 653-0493. Congratulations to the winners of our giveaway!
NEAF 2006, Suffern, NY Hundreds flocked to the Imaginova / Starry Night® / Orion booth to see the new Orion® Atlas™ EQ-G GoTo Mount with a 10” inch reflector gracefully and quietly slew to thousands of targets with the push of a button. Thanks to everyone who stopped by the booth and attended Pedro Braganca’s workshop on Starry Night® Pro Plus version 5.8. A special thanks goes to Doug George of Diffraction Limited for pitching in and demonstrating Starry Night® AstroPhoto Suite.
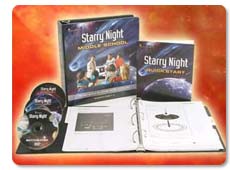
The New Mexico Edition includes lesson plans correlated to state standards, assessment tests and a special section on the space research facilities in New Mexico. Contact Mike Goodman via phone (952) 653-0493 or e-mail.
Star hopping is a method used by amateur astronomers to locate objects in the heavens - think of it as an astronomical treasure hunt. Typically, star hopping is used for finding deep sky objects, however it is just as effective for tracking asteroids, comets, variable stars and anything else in the sky that is too faint to be readily seen with the naked eye or in a finder scope. Nowadays GOTO telescopes and digital setting circles are very effective, but star hopping is still one of the best ways to learn your way around the sky. Star hopping involves "hopping" from star to star with your telescope, until you arrive at the location of the target object. Your starting point and end point are crucial to determining your "hopping path", and not unlike a car trip across a city, there are many paths you could follow. Obviously you want to take the shortest and simplest path, however, there are times when this approach is not possible due to the lack of reasonably bright stars to follow. This may surprise you, but there are many areas in the sky that are devoid of brighter stars (10th magnitude or brighter) when looking through your small telescopic field of view. If there are not enough stars to guide you to your target, it is very easy to get disoriented and "lose your place" in the sky. The opposite is also true; if there are too many stars it can get very confusing because it will be difficult to create easily recognizable star patterns. A perfect example is the Milky Way area between Deneb and Albireo in Cygnus where several dozen stars are visible within a small telescopic field of view. If a simple path is not readily evident, you will have to take "the scenic route" to arrive at your object – this may take longer and involve more steps, however it is a good trade off if you can be assured that you will find your object.
Starry Night® allows you to create star hopping charts customized to the field of view of your eyepiece and the limiting magnitude of your telescope. Get a Good Star Atlas If you own Starry Night®, you already have an excellent star atlas! Use Starry Night® on a computer while at the telescope or print out the required charts you need for a particular observing session. Starry Night® will allow you to customize exactly which objects get plotted, making your star hop easier. If you are interested in a paper sky atlas, I recommend, as a minimum, Sky Atlas 2000. The latest edition of this atlas shows stars down to magnitude 8.5 (total of 81,312 stars), and its oversized (18" x 13") pages often show entire constellations on one chart, making it easier to relate what you see on paper to what is up in the sky. I highly recommend the "desk edition" of Sky Atlas 2000, which shows black stars on white paper. The "field edition" shows white stars on black paper and is actually much more difficult to use in the dark with a red flashlight. Furthermore, the "desk edition" gives you the possibility of writing small notes, add objects, or plot comet positions because the paper is white. One last suggestion; using a pencil (or a thin permanent marker if your atlas is already laminated) add the basic constellation lines to your maps. For example, "connect the dots" in Ursa Major to form the Big Dipper, the ones in Sagittarius to form the "teapot", or the ones in Orion to form the hunter’s body. I am sure this will be of great help in quickly finding your way around a map, and ultimately the sky. If your main objective is deep sky observing, your sky atlas should also plot as many deep sky objects as possible – Sky Atlas 2000 is a good intermediate atlas in this regard, showing 2700 deep sky objects. The next best atlas is Uranometria 2000. Once you graduate past the Messier list and the brighter NGC’s, you will definitely need Uranometria because many fainter deep sky objects are not even plotted in Sky Atlas 2000. Uranometria comes in two thick volumes showing stars to magnitude 9.75 (over 280,000 stars) and over 30,000 deep sky objects (for the second edition). Because each chart is just 9" X 12" only a small portion of the sky is plotted on one page, so you will find it useful to use this atlas in conjunction with a larger scale atlas, such as Sky Atlas 2000. Some have commented that the second edition is much too crowded with deep sky objects that cannot be seen through amateur-sized telescopes. Consider the first edition, which only has 10,000 deep sky objects charted, if you can find a second hand copy (although the first edition has some errors and other quirks that were corrected in the second edition!) The ultimate star atlas is the Millennium Star Atlas. This three-volume modern work of art plots stars as faint as 11th magnitude (total of 1,058,000 stars), and over 10,000 deep sky objects. Just like Uranometria, you will need to use a larger scale atlas together with Millennium because each 9" X 13" chart shows only a very small part of the sky. Very expensive until recently, the Millennium Star Atlas is now more affordable.
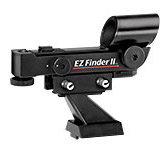
A good finder scope with a wide field of view is very important for star hopping. The very minimum is a 6 X 30 mm finder, but 8 X 50 mm is much better, and 9 X 60 mm is best. A finder with a 5 to 7 degree field of view will quickly help you zoom into the correct area of the sky by showing many faint stars at once. There will be several instances where you will be able to use your star atlas and finder to precisely aim your telescope, and then by just looking through your main telescope you should be able to see the target object in the field of view. Many people like using zero-power finders, such as a Telrad, Rigel QuikFinder, or Tele Vue QwikPoint, and although extremely useful for aiming your telescope at naked-eye objects, these are not as effective for seeing the fainter stars that guide you on your star hop. For the best of both worlds, I highly recommend using both a zero-power finder and an 8 X 50 mm (or larger) finder scope.
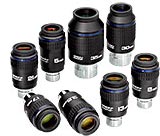
The next tip for successful star hopping is to use an eyepiece that will give you the widest possible field of view. The wider your field of view, the more stars you will be able to see through your telescope, which in turn make it easier to hop from star to star. Never star hop at higher powers as you will only frustrate yourself. You should only switch to higher power once you arrive at your target location and are ready to begin small sweeps of the area of interest. Inverted and Reversed Images Depending on your telescope type, what you see through the eyepiece will be an inverted image, or a reversed image. I am sure all of you have experienced the confusion this can lead to! As a rule of thumb, remember that an even number of reflections will give you an inverted (upside-down) image, such as a Newtonian telescope, since primary and secondary mirrors amount to two reflections. An odd number of reflections will give you a reversed (mirror) image, such as a Schmidt-Cassegrain, since primary, secondary, and star diagonal mirrors amount to three reflections, or such as a refractor with a star diagonal , since that amounts to one reflection.
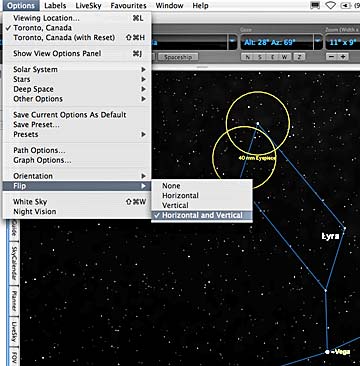
Starry Night® Pro allows you to invert or reverse the view of the sky so that it matches the view through your telescope. This makes it easier to star hop from star to star without getting lost. Inverted views in your telescope are easy to cope with - all you have to do to match what you are seeing in the eyepiece is to simply turn your sky atlas upside down. When dealing with reversed images unfortunately there is no easy solution – unless you are using Starry Night®, which allows you to flip the image so that it matches the view through your telescope. One thing you can train yourself to do is to always remember that whatever you are seeing on the map will be mirror reversed in the eyepiece. This is not too hard to master, but if similar star patters are evident on either side of your target object, things can get very confusing and you may end up star hopping in the wrong direction. Another solution is to flip over your sky chart and shine a light behind it to view a mirror image of the printing through the paper. This only works if the paper is not too thick and if your map is printed only on one side, such as Sky Atlas 2000. This trick will not work with Uranometria or Millennium since they have printing on both sides of each sheet. If a reversed view is really confusing you, you could temporarily remove the star diagonal from your Schmidt-Cassegrain or refracting telescope. Drawbacks to this solution is having to extensively turn your focusing knob to reach focus, and possible uncomfortable viewing due to the eyepiece being in an awkward position. Sky Directions Suppose you are looking for a galaxy that is just a couple of degrees north of a star you are viewing. You know you have to move your telescope north, but you just can figure out which way that is when looking through the eyepiece. Should the star in the field of view disappear towards the top or the bottom of the eyepiece? Well, it depends on many factors – telescope type, use of a star diagonal, and the orientation of your eye. The method I use to bypass all these issues is to simply move the telescope tube up (i.e. north) and forget which way the stars end up moving in the eyepiece. This works perfectly each time, assuming your telescope is equatorially mounted. If it is not, this will still work, except you will have to make a slight adjustment in azimuth. The same method will work for east or west movements. If your target is east of your current location, just move the telescope to the left, and if it’s to the west, move your instrument to the right. Again, this assumes an equatorially mounted telescope, but it will work with an alt-azimuth mount by just making a small adjustment in altitude. I like this method because I find it easy to relate what I see in an atlas to the sky. For example, the globular cluster M15 is to the right of Epsilon Pegasi, as seen in a sky map. My star hopping path would be to start by aiming the telescope at Epsilon then slowly move my telescope right until I find M15. The above trick will work just fine if you’re facing east, south, or west, but what if you are facing north? Well, if you are facing north and you need to move your telescope to the west, you should still move it to the right. This will appear as if you are actually moving it towards the eastern horizon, but in fact you are moving it west. Another way to look at it is as follows: your motor driven telescope moves from east to west (left to right). No matter which way your telescope is pointing, it’s still being driven from east to west, meaning left is always east and right is always west. This may be a rather unorthodox methodology since most observing books and articles will teach you to always think in terms of east, west, north, and south, however the method I described above for determining which way to move the telescope (left, right, up, and down) has never failed me. Give it a try as it may work well for you, too. Paul Markov has been an amateur astronomer since 1982 and this past March he star hopped to his 1000th deep sky object. In his spare time he is the webmaster for Canada-wide Astronomy Buy & Sell (www.astrobuysell.com) and UK Astronomy Buy & Sell (www.astrobuysell.com/uk).
“If I trip over this bloody thing one more time!” my wife exclaimed – only I think she might have used a different adjective. She was referring, of course, to my classic Meade LX200 8-inch circa 1992; a really nice f10, 2000mm Schmidt-Cassegrain. There it sat, in its case, in our garage, gathering a disrespectful amount of dust; its sturdy tripod supporting a stack of cardboard boxes full of painting supplies and plumbing parts. I started to concoct some lame response along the lines of “since becoming a new father I’ve wanted to devote full attention to our twins…” She wasn’t buying. “Use it or lose it, dude,” the back of her head said to me.
But what really got me and my old ‘scope moving was a new software program on my laptop. It’s a powerfully informative window on the universe called: Starry Night® Pro Plus version 5. Just a couple of clicks in Starry Night®’s “Options” pane to turn on some labels for various kinds of objects and, instantly, my appetite for observing was whet anew. My old friends Saturn, the Beehive Cluster (M44) and the Whirlpool Galaxy (M51) would all be high up in the clear air. And they’d be there early enough for me to enjoy them and still make it to work on time next morning. I might even have a shot at the Owl Nebula (M97) if skies were dark enough. “Pro Plus”, as Starry Night® insiders call it, contains a beautiful AllSky photographic image, digitally stitched together from no less than 20,000 high resolution astro-photos. It’s what you’d see if you could persistently stare at the full sphere of the sky, never once blinking, for many nights of time, from a totally airless Earth. Simply gorgeous; and a great way of choosing objects to observe. Best of all, Starry Night® promised to control my LX200 - a seductive enticement for the toy-boy, gadget-freak that inhabits my inner soul. In fact, this software can drive ‘scopes from Meade, Celestron, Orion, Astro-Physics, Discovery and others. To make my particular Meade talk and skywalk, a little wiring witchcraft needed to be invoked. Meade Instruments showed incredible foresight, nearly two decades ago, when the company designed the LX200 line. In addition to a pluggable keypad hand controller, they built in electronics and ports for illuminated reticle eyepieces, motorized focusers, CCD servo guiders, encoders, PLUS an RS232 port for computer control! And years before it was fashionable, they opened the source code for all to work with. Starry Night®’s programmers worked it. And worked it well. Now it was my job was figure out the “goes-into and goes-out-of”. My laptop has USB ports, a spec that was not even a gleam in computer engineers’ eyes back when the Meade was built. A quick e-mail to Starry Night's online support folks yielded an even quicker answer: “Get a ‘Keyspan’” – a hard-wired USB to Serial adaptor (about $35 and widely available) “or a BlueStar” – a new wireless dongle. The Keyspan talks to cameras, PDA’s, cell phones, barcode scanners, GPS boxes, MIDI interfaces, package-tracking tablets, medical equipment…the complete quiver of geek-a-zoid gear. Yes, and telescopes too. It has a USB connector on one end of a short, shielded cable and a streamlined plastic box with a 9-pin serial connector on the other. All I needed now was to get the 9-pin adapted and cabled to the Meade’s telephone-style RS232 jack. A short jaunt to the computer shop yielded a DB9-to-RJ45 multi adaptor ($12). But, as wired, the pin-outs were not what the parties on either side of the data conversation needed to see. Meade’s documentation – both in my old printed manual and online in .pdf form – was, well, a little murky on the subject. Ripping the adaptor open, it took a few leaps of logic, several educated guesses and some good old-fashioned trial-and-error to get the right pins on the Keyspan’s DB9 wired to their 14 year old counterparts on the LX200. [The magic formula: Black = Pin 3 / Yellow = Pin 5 / Red = Pin 2. Your mileage may vary.] Most scopes – including my Meade - only use 3 wires (Send Data; Get Data and Ground) for complete control of pointing and tracking. So I could have used a simple 4-conductor “telephone handset” cable. But instead I went for 25 feet of 6-conductor cable (about $10 from my local Radio Shack store). It’s not that more conductors are electronically any better. The issue is that the smaller RJ14 phone-style connector found on 4-conductor cables can get jammed sideways on the LX200 panel – especially when you’re trying to mate ‘em in the dark. The bigger 6-conductor plug fills the whole jack. It is, therefore, self-aligning. And it’s physically stronger. That’s really important for the inevitable time when somebody stresses it with a footstep.
As with most “pre-GPS” telescopes, my old LX200 needs at least a one-star alignment in order to know where the universe is. Starry Night® always knows where the universe is – it’s right there inside Starry Night®. All you need to do is tell Starry Night® where in the universe its host computer happens to be. In seconds, your screen is telling you whatever you need to know about what’s up that night – or any night within 200,000 years of tonight. No more hunting through primitive printed constellation graphics to figure out which Arabic-named superstar up there is available to align your ‘scope. With the Meade happily tracking on its motorized AltAz mount, I turned back to Starry Night® for the moment of truth. The program fully obeys the ASCOM protocol. So it was amazingly simple to establish the link between ‘scope and laptop. I opened the Telescope pane; clicked the “Configure” button; and selected the Keyspan from the pull-down list of “Communications Ports”. [I use a Mac PowerBook outdoors. If I had been on my Windows PC, I would have gotten the easy-to-follow ASCOM dialog box.] I then simply chose Meade LX200 from the extensive list of supported “Telescopes Types” and hit “OK”. Finally, I just clicked where it said “Connect” and my new 21st century automated observatory leaped to life!!! Right Ascension and Declination data poured into Starry Night®’s “Status” display, quivering with constant corrections as the Meade’s stepper motors squirted positional updates through my new cable. I was instantly controlling last century’s LX200 from Starry Night®’s four on-screen directional arrows. I could also adjust Slew Rates; set Nudge-Increments; and establish Positional Limits. That last one is something you’d really, really want to do if you had, say, a big digital SLR camera attached to the telescope. It’d be the surefire way to keep your ‘scope’s powerful motors from trashing your expensive camera as it swung through the limited clearance of the support fork. I started imagining the robotic possibilities – me inside on the couch, the hardware outside in the cold, tirelessly tracking while I sipped… Hang on a minute. A puff of cool night air woke me from my musing: One of the reasons I bought a telescope in the first place was to get out under the real sky – not a virtual one. And I smiled to myself at the irony: this computer-resident program, Starry Night®, had provided the push I needed to get back out here. Starry Night® had just taken my outdoor observing hobby to the next level. “Welcome back, Dave,” the sky said, “where’ve you been?”
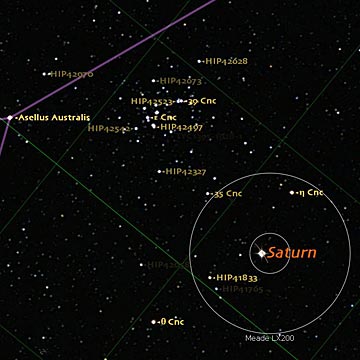
Down on the laptop, I could see a target reticle circle labeled LX200 indicating the location of the patch of the cosmos I’d see through my eyepiece. I had Starry Night®’s Zoom function pulled out to a pretty wide 130º in order to choose some targets. I pointed and Control-Clicked (Right-Clicked) on the planet Saturn. Scope and software went where I sent them – absolutely no complaints! Clicking the small arrowhead near the programs’ field of view numericals (Width x Height) dropped down a menu listing common telescopes and eyepieces.
I chose “Sample Schmidt-Cassegrain – 25 mm Plossl (35’)” and Starry Night®’s display zoomed smoothly until the dot that was Saturn resolved itself into an image of the planet shockingly similar to what I was seeing in my eyepiece – except that in Starry Night® two handfuls of Saturnian moons were labeled and their orbital paths represented by graceful arcs, shadowed appropriately to the sun angle on the big planet. Oh my goodness!!!
It was time to get serious (Sirius itself having already set, along with the Moon). I clicked open Starry Night®’s “Options” menu from the bar atop the display. I selected “Night Vision”. The screen gently faded to red. In a few minutes I was dark adapted enough to see all the useful nomenclature. With each passing interval of time, I sank further and further into the sky. I admit it: I imagined myself a lone astronomer, atop a remote mountain, (instead of a suburban ball field); temporarily granted control of an astronomically expensive, awesomely powerful, yet deftly delicate time machine. And so the night’s reverie rolled on… I soon discovered a favorite way of working. I toggled-on two features of Starry Night®’s Telescope control pane: “Sync Gaze” and “Follow Scope”. “Sync Gaze” (located under Setup) syncs the scope’s direction with Starry Night®. “Follow scope” (found under Control) slaves the software to the hardware, as an engineer might say. With these two functions keyed, I could easily put Starry Night®’s cursor on an object. Then, just pop open the drop-down menu (associated with that object) and ask both Starry Night® and my scope to move to “Slew to (named object)”. Telescope servos ramp-up smartly. And, on-screen, the sky wheels around in agreement. Starry Night® Pro Plus' really “plugs and plays” well with others. My Meade’s keypad hand controller didn’t seem to feel the least bit threatened. The best surprise was that Starry Night® was perfectly happy to let the LX200 do the driving; my laptop smoothly tracking the slewing scope across swaths of fascinating sky. Both the laptop and the keypad had full command of the ‘scope. It’s easier to use the keypad when you’re star-hopping at the eyepiece; but it’s much quicker to use Starry Night® to pick targets by name or type or reputation. [There was just a bit of lag between eyepiece and screen view. My fault. I’d left Starry Night® Pro Plus' AllSky image turned on. That caused my older laptop to huff and puff a bit while animating the “AllSky’s” detailed graphics file.] Driving a ‘scope this way is like watching the moving, annotated GPS map in your new car. All of a sudden you realize what all that real estate up there really is. You instantly appreciate the Universe for the super-set of places and attractions and delights and sights that it truly is. The combination of GO-TO-style telescope and Starry Night® is dizzyingly powerful. There’re some other benefits to “virtual astronomy”. You can pre-plan all your moves with Starry Night® Pro Plus. Save them as “Favorites”. Use Starry Night®’s “Planner” pane to easily see your options and edit a target list quickly. If you’re connected to the Web the software jumps online every time you boot it up, downloading the latest ephemeris data for all objects in its virtual universe. Especially tempting astronomical events automatically populate Starry Night®’s “SkyGuide” and “Sky Calendar” panes. There’s as much detailed information and “back-story” about your target objects as you could want. And you realize that there’re a LOT of targets up there, even in tiny scraps of sky. Instead of a confusing star chart folded out of a magazine, you’re presented with an embarrassment of celestial riches to choose between. That’s why it makes sense to rehearse your moves in daylight, building your observing plan directly in Starry Night®. As every astronaut knows, it’s always best to train as you’re going to fly, then fly the way you were trained. Musicians understand this too; indeed Starry Night®’s “Planner” pane works much like a composer’s score. Outside, in the dark, is the public performance. Whether it’s a jam session, a solo recital, or an orchestral concert is totally up to you and completely a matter of your taste. Either way, it’s vital – and fun – to spend some time in “the woodshed” (as musician’s call their practice rooms). Step through some targets on your observing plan and watch your instrument’s choreography. Your brain will retain a strong sense of those movements at night, really helping your eyes to connect with the photons your telescope is collecting. Starry Night® driving a good scope, on a capable mount, establishes that linkage you originally desired back when you bought your telescope. Computer-assisted observing plugs your telescope’s optical hardware directly into your human sensory “wetware” in a deeply profound way. You’ll find yourself completely “inside” your observations; fingertips moving from mouse or track-pad to focuser without conscious direction. Your laptop working like an encyclopedia, planetarium and starship flight deck all in one… And, if you’re with other people – perhaps family and friends - the experience is even headier. You’ll feel the quiet confidence of the knowledgeable because the deep database of Starry Night® Pro Plus is always there for you. This new software got me, my old ‘scope, and my young family out of the house and interested in new aspects of each other, under Nature’s original starry vault. Our kids are bright, but they get chilly quickly and bored with their daddy’s stellar fixations even faster. They do love computers, though. With Starry Night® running the show – virtually on the laptop’s screen and kinetically as the big Meade impressively and obediently servo-tracks from attraction to attraction on the sky, I can hold my audience of 4 year olds without having to resort to bribery, hollow threats or physical restraints. No, our family’s telescope sure isn’t a dusty trip hazard anymore!! Just ask my wife. Amateur astronomer Dave Brody is Executive Producer at Imaginova (parent company of Starry Night®), expertly weaving Starry Night® visuals into SPACE.com multimedia and podcasts. Tune into SPACE.com’s podcast <http://www.space.com/php/siteinfo/RSSinfo.php> for audio adventures in the universe of space science and technology.
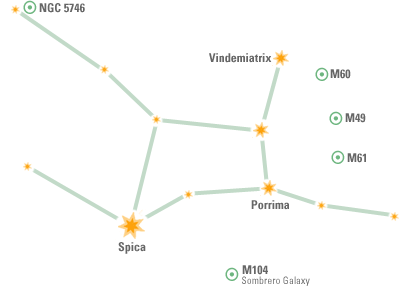
Don't let the scale of the diagram above fool you. Representing the goddess of justice, Virgo is the second largest constellation in the sky. Spica, a first magnitude blue-white star, is easy to spot, shining as it does in a fairly dark part of the sky. M49 and M60 are elliptical galaxies. Being one of the brightest ellipticals, M49 was the first member of the Virgo-Supercluster to be discovered by Charles Messier. M60 is some 60,000,000 lightyears distant and is as luminous as 60 billion copies of our sun. Most of the galaxies in Virgo are part of the Virgo-Supercluster. Not so M104. At about 50,000 lightyears, this galaxy's dark dust lane and close to edge-on angle (just 6°) makes it look a little like a sombrero. M61 is a lovely face-on spiral galaxy while NGC 5746 is an edge-on spiral galaxy that's best observed in small scopes. Finally, Porrima is a fine doule-star worthy of a peek. Sean O'Dwyer
|
June 2006
|
|||||||||||||||||||||||||||||||||||||||||||||||||||||||||||||||||||
|
Photo of the Crescent Moon taken by Ken Stewart, West Haven, Utah. Captured with a Fuji Finepix S700 Digital Camera, The ISO was 200 and the exposure 1/2 second. PHOTO OF THE MONTH COMPETITION: We would like to invite all Starry Night® users to send their quality astronomy photographs to be considered for use in our monthly newsletter. Featured submissions (best of month) will receive a prize of $25 USD. Please read the following guidelines and see the submission e-mail address below.
|
||||||||||||||||||||||||||||||||||||||||||||||||||||||||||||||||||||
 |
||||||||||||||||||||||||||||||||||||||||||||||||||||||||||||||||||||
|
|
||||||||||||||||||||||||||||||||||||||||||||||||||||||||||||||||||||
 Attention, New Mexico Teachers! Starry Night® Middle School and High School have just been adopted as Instructional Materials by the New Mexico Public Education Department.


You have received this e-mail as a trial user of Starry Night® Digital Download
or as a registrant at starrynight.com. To unsubscribe, click here.