 |
||||||||||||||||||||||||||||||||||||||||||||||||||||||||
|
If you have trouble viewing this newsletter, click here. Welcome again to our monthly newsletter with features on exciting celestial events, product reviews, tips & tricks, and a monthly sky calendar. We hope you enjoy it!
There are up to 10 new features in the NEW! Starry Night® 5.7 Update. As a thank you for all those who have purchased Starry Night® version 5, this 5.7 update (for version 5 users of Starry Night® Enthusiast, Pro or Pro Plus 5) with unprecedented new features and data is absolutely FREE! Click here for instructions on how to get your 5.7 update. If you don't already own Starry Night® version 5, NOW is the best time to upgrade. Order before November 14 to receive savings on Starry Night® version 5 upgrade packs. Click here to find your discounted upgrade price. NEW in Starry Night version 5.7
Starry Night Enthusiast 5.7 users will also enjoy
Starry Night Pro 5.7 users can take advantage of these new features included in Enthusiast 5.7, PLUS
Starry Night Pro Plus 5.7 users will receive all the new features in Pro
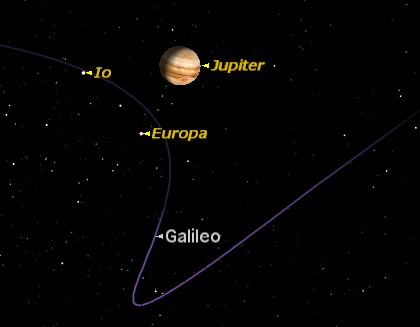
Order by November 14 to receive your discounted upgrade price! Please note you must already have a registered copy of Starry Night Enthusiast, Pro or Pro Plus version 5 in order to receive the FREE 5.7 update. Click here for instructions on how to get the new features and data in 5.7 update. *All prices are quoted in USD. Special upgrade prices for Starry Night version 5 upgrade packs expire November 14, 2005 11:59 pm EST. Not valid on previous purchases. Space Missions (Probe Paths) [Enthusiast, Pro, Pro Plus, Middle School and High School] Follow the actual path of a space probe's orbit through the solar system in Starry Night®. The space probe's past, current and future paths can be drawn onscreen.
Explore interplanetary space missions and relive some of the spectacular views seen by the following space probes:
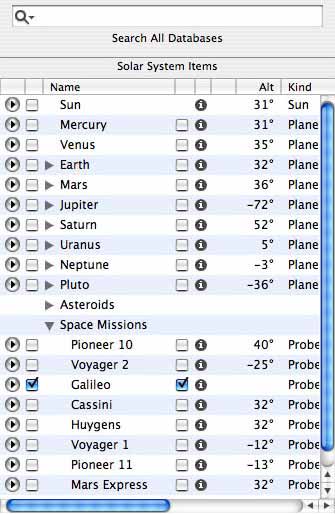
SkyGuide Space Mission Tour The best way to explore space missions is by taking a guided tour in SkyGuide. Open the SkyGuide Pane and click on either the "Guided Tours" or "Enter SkyGuide" link depending on which version of Starry Night you own. Then click on the "Space Missions" link to start the tour. Finding Space Missions Space probes are listed in the Find Pane under Space Missions. The info (i) button listed beside each space probe provides you with a brief overview of the probe's mission.
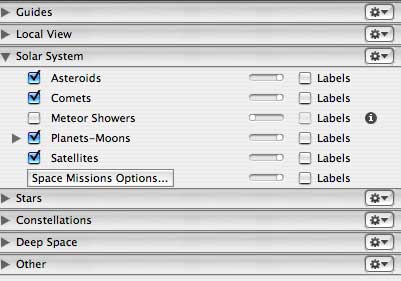
Check the box to the left of an object's name to label it. Check the box to the right of an object's name to turn on its orbital path line. Space Mission Options To modify the appearance of a space probe's path, click on the Options Pane and expand the Solar System layer. Then place your mouse cursor over the words "Space Missions"- the Space Missions Options button will come up - click on it.
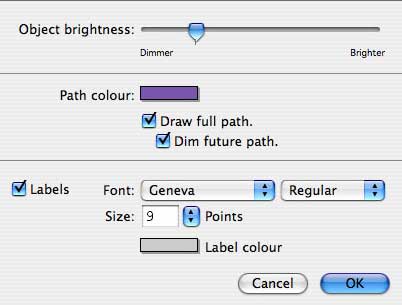
Clicking the Space Missions Options button will bring up the Space Missions dialog box. From here you have several options:
Note: Orbital paths are also depth queued, meaning that the further away a line segment is away from your "eye" the dimmer it will appear. See More New Features Click here for instructions on how to access all the new features of Starry Night® 5.7 and visit our 5.7 Update Page for more information: https://store.starrynightstore.com/57-landing.html
In the August issue I wrote about exploring the sky using the Orion IntelliScope’s tour feature. But most telescopes aren’t equipped with computerized tours to guide the beginner through the sky. Here is a guide to finding interesting objects in the sky if you don’t have computer assistance. Seeing versus finding There’s difference between finding the location of an object and actually seeing it. Many of the objects we amateur astronomers look at are too faint to be seen with the naked eye. Some are too faint to be visible in our scope’s finder. Some may be so faint as to be a challenge to see in the main telescope. Seeing can be difficult. Finding an object, on the other hand, involves pointing the telescope at exactly the spot in the sky where the object is located. This can be done with a computer, or manually using a technique called starhopping. It’s not necessary to be able to see an object to point at it with the telescope. Many beginners make the mistake of looking for objects which are easy to find (because they are close to bright stars or familiar constellations) but which are very hard to see, because they are very faint. For example, many go hunting for the galaxy Messier 101 in Ursa Major because it is located close to two bright stars in the handle of the Big Dipper. Unfortunately, M101 is one of the most difficult objects in Messier’s catalog to see because it is large in size and very faint, so its dim light is spread over a large area. Unless you have very dark skies and a trained eye, you can be staring right at M101 and never see it! So it’s important, when you’re starting out, to go for objects which are both easy to find (located near bright stars or constellations) and also easy to see (bright clear objects, such as double stars and star clusters). Leave the dim galaxies (for the most part) until you have more experience. Starhopping
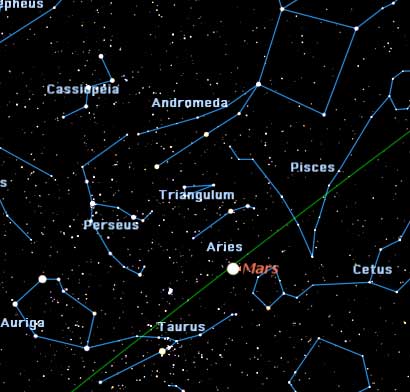
The first step is to print out a chart or two to take outside with you. Many of the charts you find in books or magazines are less than helpful for two reasons: they try to show all the sky, and they show it on too small a scale. I prefer to use charts which show only part of the sky, but which are on a large enough scale to approximate the actual spacing of the stars across the sky. For example, here’s a chart from Starry Night® showing a section of sky roughly 90 degrees square, facing east at 8 pm on November 5:
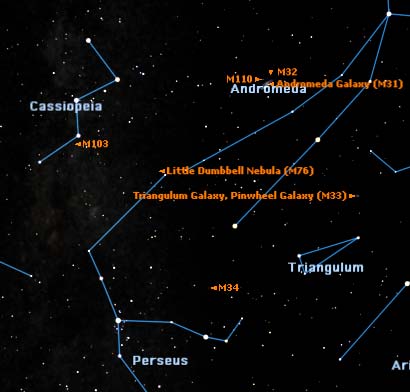
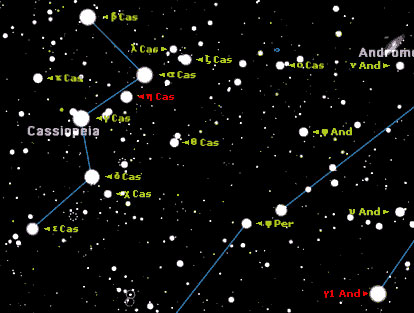
Go out with this chart and face east. The top of the chart is overhead, the bottom is the horizon. The most obvious object in the eastern sky is Mars, glowing brightly about a third of the way from horizon to overhead. But our targets for tonight are farther away. As I said earlier, the Big Dipper is a poor starting place for deep sky hunting because it lacks bright objects. Let’s look instead at Cassiopeia, a constellation which lies almost directly opposite the Big Dipper in the northern sky. In this chart, it's about two thirds of the way from horizon to zenith, an obvious lopsided W shape, visible even under city skies. Once you’ve identified Cassiopeia, you have some landmarks which will let you point your telescope at a variety of interesting objects. Here’s a more detailed chart of the Cassiopeia, made by zooming in with Starry Night®:
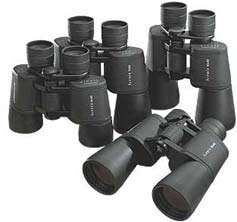
Besides your star chart, you will need a red flashlight to read it. You will also find it very helpful to have a pair of binoculars with a field of view similar to that of the finder scope on your telescope. Two double stars Let’s start by tracking down a couple of double stars. Many beginners are unaware that many of the stars which appear single to our naked eyes are double or multiple in a telescope. They are great targets for beginners because they are easy to see as well as easy to locate. The five bright stars in Cassiopeia which mark the W are named, from top to bottom in this view: Beta β, Alpha α, Gamma γ, Delta δ, and Epsilon ε. We can find our first double star, Eta η Cassiopeiae, by looking a little less than half way between stars Alpha α and Gamma γ. You can see it there in the chart below, marked by the Greek letter Eta η. Place the crosshairs in the finder of your telescope on that star, and when you look through the telescope you will see it is actually two stars: a bright yellow one and a fainter red one.
The second double star is a bit farther afield, but illustrates the principles of starhopping. Look at the two top stars of the W, Beta β and Alpha α. Use the distance between these two stars as your “measuring stick.” Extend the line from Beta to Alpha by two stick lengths to the lower right, which will take you to the star 51 Andromedae. Continue in the same direction about half the distance again, and you will reach a brighter star, Gamma γ Andromedae. This is our target: in the telescope it will appear as a double star, the two stars a bit closer than Eta η Cassiopeiae, and this time colored gold and blue. Four star clusters Now let's go after some deeper targets, some of the beautiful star clusters located in or near Cassiopeia. First take a close look at Delta δ Cassiopeia (second from the bottom in the W). In binoculars you will see a fairly bright star below and to the right of it, Chi χ Cassiopeiae. Use the line between Delta and Chi as the base of an equilateral triangle hanging below them, and put the crosshairs of the finder on the lower angle of this triangle. Through the telescope’s eyepiece you will see a compact little star cluster, number 103 in Messier’s catalog. Imagine a tall thin isosceles triangle on the opposite side of the same baseline, put your crosshairs there, and through the telescope you will see the star cluster NGC 457. It has two bright stars in it which many people see as eyes. Traditionally those are the eyes of an owl, the rest of the cluster forming the erect body of the owl with wings outstretched. But to our modern eyes, it looks rather like the character E.T. in the famous movie. So this cluster is called by some the Owl Cluster and by others the E.T. Cluster! Let’s go hunting farther away. This time use the line joining Gamma and Delta Cassiopeia as your measuring stick and pointer. Go twice its length downward towards the horizon and you should see a fuzzy patch through your binoculars and finder. Through the telescope you will see the Double Cluster in Perseus, one of the wonders of the night sky in any telescope. If you keep going in the same direction towards the horizon you will encounter a line of three bright stars, the last of which is at the center of a little known star cluster, Melotte 20. The trouble with this cluster is that it is so close to us that its stars are spread wide across the sky, too wide to fit in most telescopes, so that they can only be viewed with binoculars or the naked eye. This is one of the star clusters closest to our Sun, also called the Alpha Persei Moving Cluster because the star Alpha α Persei is at its center, and all the stars share a common proper motion across the sky. And a galaxy
Geoff Gaherty
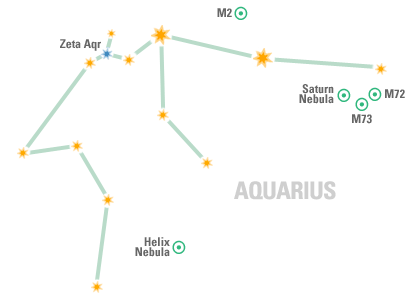
The Saturn Nebula (NGC 7009) is an oval Mag 8 fuzzy patch hanging in space about 4,000 lightyears distant. Medium-sized scopes show a ring with "knobs" on either side. M72, close by, is a small remote globular cluster, difficult to resolve. The open cluster M73 is a tiny triangular collection of stars, barely noticeable. However, the same field of view contains a lovely Lyra-like asterism. The Mag 7 globular cluster M2 is about 40,000 lightyears away. Although among the brightest of globs in the sky, M2's core is so concentrated that, as an observational object, it ranks as one of the less compelling. The Helix Nebula (C63/NGC 7293) is a tricky target. Although it is the largest visible planetary in the night sky (about half the apparent diameter of the full moon) it's quite dim. Dark skies are a must. A low power eyepiece in your telescope, with averted vision, may give you some hint of structure. Finally, 103 lightyears distant is one of the sky's finest doubles, Zeta Aquarius. Sean O'Dwyer, Starry Night® Times Editor
|
Oct/Nov 2005
|
|||||||||||||||||||||||||||||||||||||||||||||||||||||||
|
Submit photos to SPACE.com for a chance to win a trip to Hawaii, a new Nokia 6682 and more! Sponsored by Nokia and Imaginova. Have you been taking pictures with your new digital camera? Your albums of science and space images could be your winning ticket to a trip to Hawaii. Nokia and SPACE.com are looking for your best astronomical and science photography. Submit your cool images to Amazing Images and, if your entry is voted one of the best, you can qualify to win amazing prizes. For a chance to win, go to: space.com/amazingimages/summerunderthestars/ GRAND PRIZE...
AND...
For more information on the other prizes or to submit photos, go to: space.com/amazingimages/summerunderthestars/ Don't forget to tell your friends. The more times (and more friends) who vote, the more chances you have to win!
|
||||||||||||||||||||||||||||||||||||||||||||||||||||||||
 |
||||||||||||||||||||||||||||||||||||||||||||||||||||||||
|
|
||||||||||||||||||||||||||||||||||||||||||||||||||||||||
You have received this e-mail as a trial user of Starry Night® Digital Download
or as a registrant at starrynight.com. To unsubscribe, click here.
